End of Week One
This is really déjà-vu for me blogging again. We started up these blogs at the beginning of the 2006 season and they’ve morphed into and out of use and back into use again over the last two years. The purpose of these blogs are to keep the mounds of people who support this robotics teams either daily, weekly or monthly caught up on news so that we can all dive right in when we are together at Castilleja. Sherri has committed from the student team to blog regularly and I have committed from the mentor team to do the same.
After a tough first week, I think we’re on a roll. I do believe that the key to success mentoring this team is to get them hands on with problem solving and to let their intuition guide them once they start experimenting through this design phase. Fearless team leader Erin O’Malley just got back yesterday from a long journey to India, so give her a hug or high five when you see her! Here’s where we are . . .
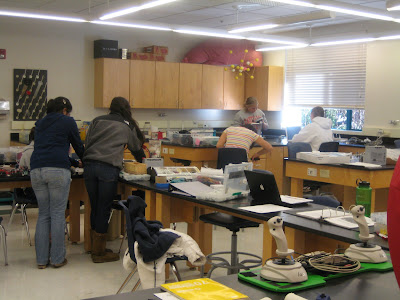
OVERALL TEAM OPS: Running much more smoothly. It’s a really tough year because we have a lot of newbies and a lot of mentors. The girls who are leading want to get into the nitty gritty of designing but they have to manage us big kids AND the little kids and give us something to do. On Saturday afternoon, the mentors and the team leads had a meeting, and we decided that for the next two weeks, to try tackling the design with small teams focused on one part, rather than keeping everyone within their discipline (i.e. build, programming etc.).
CHASSIS / OPERATOR INTERFACE: (Caroline, Sherri, Allie, Anne, David (Mentor)) Lots of progress this weekend. The team is building a prototype chassis with the kit of parts with all the motors and electronics attached so that they can start working on the coding, which I think is a brilliant idea. They had a lot of driving issues with Scottie last year, a lot of which I think can be solved using smoothing algorithms (moving averages, PID controllers). Also, David mentioned that he’s used a yaw sensor to detect slipping so that we can also adjust for straight driving using electronics and code. We also have two gear tooth sensors that can be mounted to equalize the two sides of the chassis (Doug worked on this with interrupts two years ago and I still have the notes on flipping bits in the registers).
** We can also work on the input side – Jimmy and I have been chatting about tank drive (having two single axis inputs vs. one two axis input, which is really confusing). Karlin found that http://www.ifirobotics.com/ already has a USB board that makes it possible to connect all sorts of other input devices to the operator interface. The easiest way to do this right now is to take the two joysticks provided and to constrain their motion to only one axis (y-axis), read only that input and let a driver try using two of them at the same time. Fun problem.
** Goals for the week: The girls are planning to have the prototype chassis finished by sometime middle of this week. They are currently using wheels from two years ago and the same gear box and motors from two years ago. They had some issues finding bolts long enough today and are going to have to move their electronics board out of the way to the back in order to screw the gear boxes to the frame, but their close. The electronics look like they are all hooked up and can turn on (please note they are using the robot controller from 2005, which means when they compile, they need to make sure they compile for the PIC18F8520 (pre-2006) and not the PIC18F8722 (post-2006). They will likely also need help with the chain and tensioning it. They are also working with Ms. Mourad to get these omnidirectional wheels (http://www.andymark.biz/am-0083.html) Really hot stuff.
I’m really looking forward to debugging system issues on this prototype chassis (get all the code and sensors hooked up) before the real chassis gets built!! Go team.
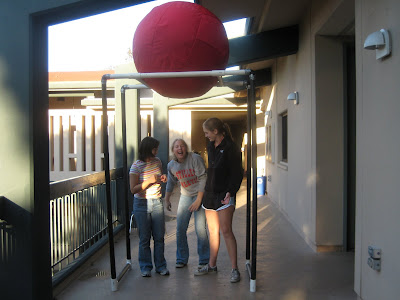
LIFT / CLAW: (Nandini, Erin, Anne, Emily (Mentor), Karlin (Mentor)) Good progress this week. I worked with newcomers Annie, Divya and Crystal to build a portion of the overpass field element today (see photo below). This really helped us to experience what it like to manipulate the ball (like put it on and push it off) its sitting position. We discovered that it’s actually pretty easy to push off from below by just running into it with some momentum using first, Annie’s forehead, and then pieces of 80-20 and PVC pipe.
** In the last week, we’ve been bouncing a number of ideas. Jimmy and I have talked about elevator lifts and four bar linkages which help us start within the 60” tall X 38” width boundary and still be able to reach up beyond 78” with a claw. Fundamentally I am pretty concerned about the center of mass of the 40” diameter trackball. I think the more time we can drive around and keep it above our CG the better.
** Nandini spent a lot of time with David on Saturday exploring a good number of options for the claw. They explored the option of the claw having three actuated prongs, and then three prongs with only one active to clasp it. Nandini also had an interesting idea based on a tarp and a draw string, and finally, she has some really good thoughts on using rollers at the ends of the arm / gripper to keep the ball in place once in possession and to also expel the ball when ready. Thanks to Nandini for catching us up over the phone today and to Crystal for calling her.
** Annie, Crystal, Divya and I, after discovering the power of pushing from below, took a look at a solution based on a windmill. The pivot point would be high up and the two windmill arms tucked within the starting volume would rotate out to push and catch the trackball coming off the overpass all in one motion of driving through under the overpass at a fast speed. (VIDEO: Click here) . Divya came up with the idea of having a second smaller scoop type mechanism at the base of the robot that can get the trackball off the ground and into a position that the big windmill can scoop up and drop onto the overpass in order to hurdle. I’m having them prototype the system with ¾” PVC (they have a stash in the science project room in the back, along with a PVC cutter) now.
** So, I think all solutions are still on the table, but I would encourage everyone to start moving to wood, PVC etc. in 1:1 scale. I also pulled up Solidworks and used sketches to demonstrate the path of a linkage / arm and have them guide me while sketching changes. We also, with Doug’s speedy help, managed to get the portion of the overpass that we built at the right height (it’s tall) and sturdy enough for now. You’ll have to put it together outside in the walkway since with the ball on it, it’s way higher than the classroom ceilings.
OTHER STUFF: Keep us posted on your schedule. Thanks to Karlin for putting up the Google Calendar. I’ll be there on Wednesday night by 5:30 pm. See everyone next week for more fun!
Em
posted by HomogeneousTransform at 10:11 PM
![]()

0 Comments:
Post a Comment
<< Home